Dilated Diffusion from DemoFusion
5 Ways It's Transforming AI Image Generation
TDLR: see demo of dilated diffusion in a collab
 </span>
At the #CVPR24 best paper review, I came across an exciting stable diffusion paper.
DemoFusion: Unlocking High-Resolution AI Image Generation with Dilated Diffusion
DemoFusion Democratising High-resolution Image Generation without a Sweat
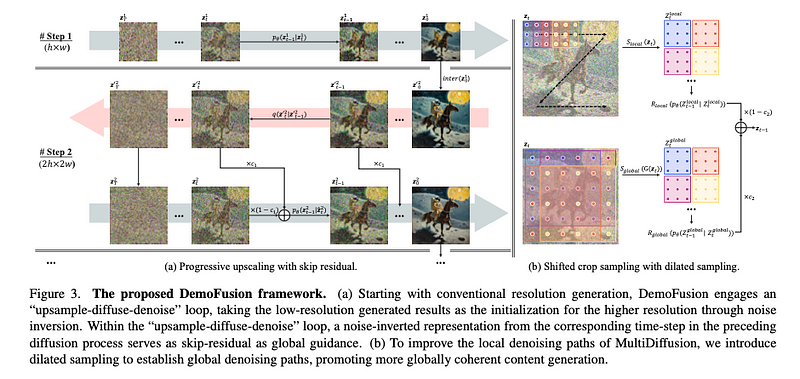
The goal of this research is to democratize high-resolution image generation while reducing costs. DemoFusion extends Latent Diffusion Models (LDMs) by introducing Progressive Upscaling, Skip Residuals, and Dilated Sampling mechanisms.
Key Features of DemoFusion:
- Progressive Upscaling: Iteratively increases image resolution using lower-resolution results as a base.
- Upsample-Diffuse-Denoise Loop: Utilizes noise-inverted representations for guiding higher resolution generation.
- Dilated Sampling: Enhances global context, resulting in more coherent image generation.
Applications of DemoFusion:
- Generate high-resolution images up to 4096×4096 using standard hardware like an RTX 3090 GPU.
- Integrate with ControlNet for additional functionality.
- Upscale existing images by encoding them into the LDM’s latent space.
Bonus: Intermediate results are available during the generation process, enabling rapid iteration and previewing.
Check out more demos here.
Exploring the Concept and Benefits of Dilated Sampling in AI Image Generation

Concept of Dilated Sampling:
Imagine an image as a grid of pixels. Instead of processing each pixel in sequence, dilated sampling selects every second or third pixel, which creates a broader view of the image. This technique enables fewer steps, while providing a broader context for denoising and refining images.
Purpose of Dilated Sampling:
The goal is to capture global image information instead of focusing on small local details. This method helps establish a global context, leading to more cohesive and coherent image generation.
Implementation of Dilated Sampling:
- A regular pattern is avoided; instead, dilated sampling skips pixels based on a dilation factor. For example, if the dilation factor is 2, every second pixel is picked.
- Shifting and Combining: The sampling shifts its starting point in each round to ensure complete image coverage.
Preventing Image Graininess:
One drawback of dilated sampling is the potential for graininess, as the sampled pixels are spread apart. To counter this, a Gaussian filter smooths the image before sampling, ensuring the sampled points represent the image more accurately.
Conclusion: How Dilated Sampling Enhances AI Image Generation
Think of dilated sampling like stepping back to admire an entire painting before focusing on the details. This technique strikes a balance between global perspective and fine detail, resulting in high-quality images.
Step-by-Step Code Implementation
For those interested in the technical details, full code is available on GitHub: DemoFusion GitHub Repository.
CODE STEP BY STEP
Full code can be found in author’s github: https://github.com/PRIS-CV/DemoFusion/blob/main/pipeline_demofusion_sdxl.py
views = [[h, w] for h in range(current_scale_num) for w in range(current_scale_num)]
views_batch = [views[i : i + view_batch_size] for i in range(0, len(views), view_batch_size)]
Here, `views` and `views_batch` set up the grid for dilated sampling. `current_scale_num` determines the dilation factor, creating a sparse sampling grid.
Gather more global information about the image rather than focusing on local details.
# Grid for dilated sampling
count_global = torch.zeros_like(latents_)
value_global = torch.zeros_like(latents_)
`count_global` and `value_global` are initialized to aggregate global information.
# Loop for picking pixels with gaps
for j, batch_view in enumerate(views_batch):
  latents_for_view = torch.cat( [ latents_[:, :, h::current_scale_num, w::current_scale_num] for h, w in batch_view ])
The loop iterates through `views_batch`, picking pixels with a gap determined by `current_scale_num`.
for j, batch_view in enumerate(views_batch):
  latents_for_view_gaussian = torch.cat([latents_gaussian[:, :, h::current_scale_num, w::current_scale_num] for h, w in batch_view])
`latents_for_view_gaussian` ensures the global context is gathered, then combined with local details later.
Shifted dilated sampling means the starting point shifts to cover different parts of the image. The global context is combined with local details to refine the final image.
Gaussian filter is applied to smooth the image before sampling
std_, mean_ = latents_.std(), latents_.mean()
latents_gaussian = gaussian_filter(latents_, kernel_size=(2*current_scale_num-1), sigma=sigma*c3)
latents_gaussian = (latents_gaussian — latents_gaussian.mean()) / latents_gaussian.std() * std_ + mean_
Smart Blending
Combining global and local details ensures that the image retains the broader context and finer details.
for latents_view_denoised, (h, w) in zip( latents_denoised_batch.chunk(vb_size), batch_view):
 value_global[:, :, h::current_scale_num, w::current_scale_num] += latents_view_denoised
 count_global[:, :, h::current_scale_num, w::current_scale_num] += 1
Here, denoised views (`latents_view_denoised`) are added to `value_global`, blending the global and local contexts.
The final latent representation is formed by blending global and local contexts.
value_global = value_global[:, :, h_pad:, w_pad:]
value += value_global * c2
count += torch.ones_like(value_global) * c2
latents = torch.where(count > 0, value / count, value)
The global values are combined with local values (`value += value_global * c2`) and normalized (`latents = torch.where(count > 0, value / count, value)`).
CONCLUSION
This code implements dilated sampling by creating a grid with gaps (dilation), applying a Gaussian filter to smooth out graininess, gathering global context, and then blending it with local details to form the final denoised image. This process ensures a balance between capturing the big picture and refining the details.
Try out a simple demo illustrating the concept of dilated sampling
The demo is a simple illustration of the dilated sampling concept using simulated data. The visualizations help in understanding how dilated sampling and smoothing work together.
- Original Image: — A simple checkboard patten image is created for demonstration.
- Smoothed Image (Gaussian Filter): — The original image is smoothed using a Gaussian filter to reduce graininess.
- Dilated Sampling after Smoothing: — Dilated sampling is applied to the smoothed image, resulting in a more coherent global context.
- Dilated Sampling: — Pixels are sampled with a gap (dilation factor).